

To use the Yoast SEO plugin for WordPress, install and activate the plugin, then configure it via the dashboard. Follow the prompts for optimization.
Yoast SEO is a powerful tool to enhance your WordPress site’s search engine visibility. It simplifies the process of optimizing your content for search engines. By following its user-friendly interface, you can improve your site’s ranking and drive more organic traffic.
The plugin offers features like keyword optimization, readability analysis, and technical SEO improvements. Its built-in suggestions help you make your content more engaging and search engine friendly. Regular updates ensure you stay aligned with the latest SEO practices. With Yoast SEO, even beginners can effectively optimize their websites without needing advanced technical skills.
Introduction To Yoast Seo
Yoast SEO is a powerful tool for improving your WordPress site’s search engine rankings. It helps you optimize your content for search engines, making it easier for people to find your site.
This plugin offers a range of features that simplify SEO tasks, even for beginners. Understanding how to use Yoast SEO can significantly boost your site’s visibility.
Why Yoast Seo?
Yoast SEO is popular because it is user-friendly and highly effective. It provides actionable insights that help improve your site’s SEO performance.
- Easy to use: Even beginners can navigate its features.
- Comprehensive toolset: It covers all essential SEO elements.
- Regular updates: Keeps up with Google’s changing algorithms.
Key Features
Yoast SEO comes packed with features designed to improve your site’s SEO. Here are some key features:
| Feature | Description |
|---|---|
| Content Analysis | Evaluates your content for readability and SEO optimization. |
| XML Sitemaps | Automatically generates sitemaps to help search engines crawl your site. |
| Meta Tags | Allows you to set custom meta titles and descriptions. |
| Social Integration | Optimizes your content for social media sharing. |
| Focus Keyword | Lets you set a focus keyword and checks its usage in your content. |
Using Yoast SEO can make your SEO efforts more effective and manageable. Its features are designed to help you rank higher and get more traffic.
Installation Process
Installing the Yoast SEO plugin for WordPress is easy. Follow the steps below to get started with this powerful SEO tool.
Plugin Installation
First, log in to your WordPress dashboard. In the left sidebar, navigate to Plugins and click on Add New.
In the search bar, type Yoast SEO and press enter. You will see the Yoast SEO plugin in the search results. Click on the Install Now button next to the Yoast SEO plugin.
After the installation is complete, click on the Activate button to enable the plugin on your site.
Initial Setup Wizard
Once the plugin is activated, you will see a new menu item called SEO in the left sidebar. Click on it to open the Yoast SEO dashboard. You will see a notification asking you to run the configuration wizard. Click on the configuration wizard link.
The setup wizard will guide you through several steps:
- Environment: Choose whether your site is live or under construction.
- Site Type: Select the type of site you have, such as a blog or an online store.
- Organization or Person: Fill in the details about your organization or yourself.
- Search Engine Visibility: Select which types of content you want to be indexed by search engines.
- Multiple Authors: Indicate whether your site has multiple authors.
- Google Search Console: Connect your site to Google Search Console for better insights.
- Title Settings: Set up your site’s title and separator.
Click Next after completing each step. Once you finish, the setup wizard will save your settings.
Congratulations! You have successfully installed and set up the Yoast SEO plugin. Now, you can start optimizing your content for better search engine rankings.
Configuring General Settings
Configuring the general settings in the Yoast SEO plugin is crucial. It helps optimize your WordPress site for search engines. This guide will walk you through the essential settings. Make sure your site is search-engine friendly.
Site-wide Settings
First, navigate to the Yoast SEO dashboard. Click on the General tab. Here, you can adjust site-wide settings.
- Site Name: Enter your website’s name.
- Tagline: Add a brief description.
- Company or Person: Specify if your site represents a person or a company.
Save your changes to apply these settings. These settings help search engines understand your site better.
Webmaster Tools
Next, configure the Webmaster Tools settings. This helps verify your site with major search engines.
| Search Engine | Verification Method |
|---|---|
| Enter your Google verification code. | |
| Bing | Enter your Bing verification code. |
| Yandex | Enter your Yandex verification code. |
To find these codes, go to each search engine’s webmaster tools. Copy the provided verification code. Paste it into the corresponding field in Yoast SEO.
Click Save Changes to apply these settings. Verifying your site with these tools improves your SEO.
Optimizing Content
Optimizing content is crucial for your website’s success. The Yoast SEO plugin for WordPress makes this process easier. It helps you enhance your content for search engines. Below, we cover how to optimize content using the Yoast SEO plugin.
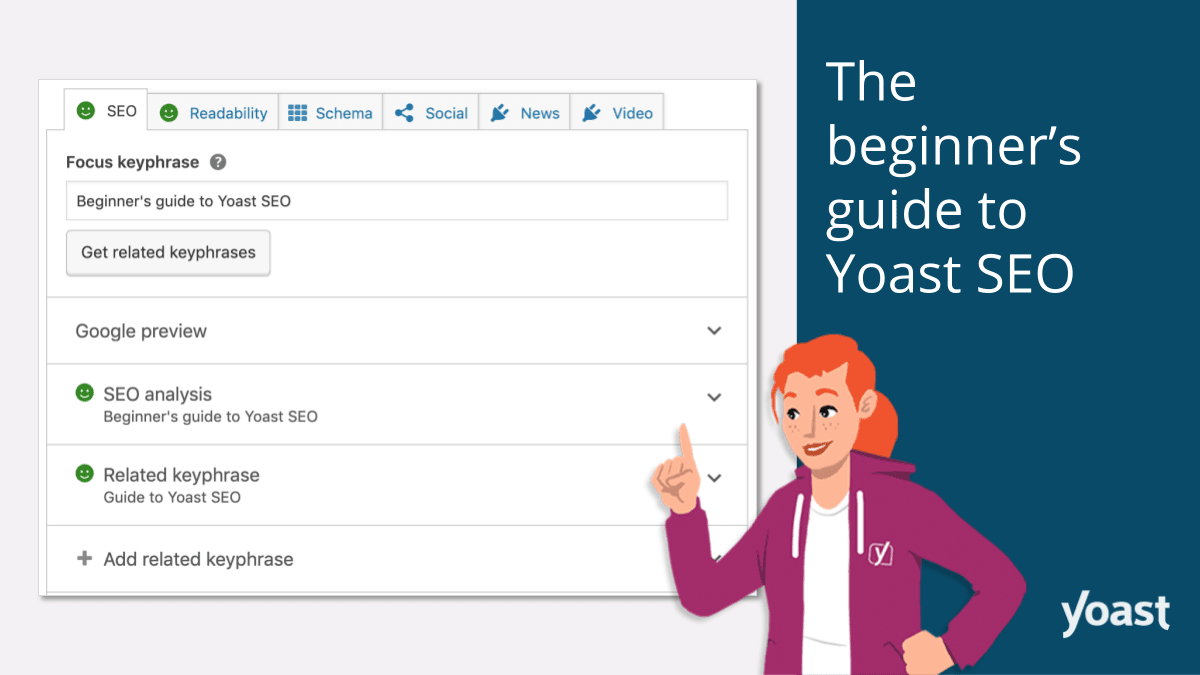
Focus Keywords
Your focus keyword is vital for SEO. It is the main term you want your post to rank for. In the Yoast SEO plugin, add your focus keyword in the appropriate field. The plugin then analyzes your content based on this keyword.
- Use the focus keyword in the title.
- Include it in the first paragraph.
- Place it in the URL.
- Make sure it appears in the meta description.
Use synonyms and related terms for better optimization. This helps search engines understand the context of your content.
Content Analysis
The Yoast SEO plugin provides a detailed content analysis. This feature offers insights on how to improve your post. Here are some key points the plugin checks:
- Readability: The plugin checks sentence length, paragraph length, and use of subheadings.
- Keyword Density: It ensures the focus keyword appears enough times in your content.
- Internal Links: It encourages linking to other posts on your site.
- External Links: It suggests adding links to other reputable sites.
- Meta Description: It helps you create an engaging meta description with the focus keyword.
Each point gets a color-coded score: green for good, orange for okay, and red for needs improvement. This visual feedback helps you quickly identify areas for enhancement.
Follow these suggestions to make your content SEO-friendly. This increases your chances of ranking higher in search results.
Improving Readability
Using the Yoast SEO plugin for WordPress can significantly enhance your site’s visibility. One crucial aspect of this is improving readability. Readable content engages your audience and keeps them on your page longer. Yoast SEO offers tools to help you make your text easy to read.
Readability Score
Yoast SEO provides a readability score for your content. This score helps you understand how easy your text is to read. The plugin uses various criteria to generate this score.
| Criteria | What it Checks |
|---|---|
| Sentence Length | Sentences should not be too long. |
| Paragraph Length | Keep paragraphs short and to the point. |
| Subheadings | Use subheadings to break up text. |
| Transition Words | Use words like “and,” “but,” and “because.” |
| Passive Voice | Avoid using passive voice frequently. |
Suggestions For Improvement
Yoast SEO not only scores your content but also provides suggestions for improvement. These tips can help make your writing better.
- Shorten sentences: Aim for sentences with fewer than 20 words.
- Use subheadings: Break long sections into smaller parts.
- Include transition words: Words like “thus” and “therefore” help flow.
- Limit passive voice: Use active voice whenever possible.
- Write shorter paragraphs: Keep paragraphs under 150 words.
By following these suggestions, your content will become more engaging and easier to read. This keeps visitors on your site longer and improves your SEO.
Managing Meta Descriptions
Understanding how to manage meta descriptions is key to improving your website’s SEO. The Yoast SEO plugin for WordPress makes this task simple. Follow the steps below to optimize your meta descriptions effectively.
Title Tags
Title tags are essential for SEO. They tell search engines and users what your page is about. Using the Yoast SEO plugin, you can easily edit your title tags.
- Navigate to the Yoast SEO section in your WordPress dashboard.
- Open the page or post you want to edit.
- Scroll down to the Yoast SEO meta box.
- Click on the “Edit Snippet” button.
- Enter a descriptive and keyword-rich title in the “SEO Title” field.
Meta Descriptions
Meta descriptions provide a brief summary of your page. They appear in search engine results and influence click-through rates.
- In the Yoast SEO meta box, find the “Meta Description” field.
- Write a concise and engaging description. Use keywords naturally.
- Aim for a length between 150-160 characters.
- Ensure the description is unique for each page or post.
Below is an example of how to fill in the fields:
| Field | Example |
|---|---|
| SEO Title | How to Use Yoast SEO Plugin for WordPress |
| Meta Description | Learn how to use the Yoast SEO plugin for WordPress. Improve your site’s SEO with easy steps. |
By following these steps, you can ensure your meta descriptions are effective. This will help improve your website’s visibility in search engine results.
Setting Up Xml Sitemaps
XML Sitemaps are crucial for search engine optimization. They help search engines understand your site’s structure. The Yoast SEO plugin simplifies the process of creating and managing sitemaps. Follow these steps to set up XML sitemaps in Yoast SEO.
Activating Sitemaps
First, you need to activate the XML sitemaps feature in Yoast SEO. Follow these steps:
- Go to your WordPress dashboard.
- Navigate to SEO in the sidebar.
- Click on General.
- Switch to the Features tab.
- Find the XML sitemaps feature.
- Toggle the switch to On.
- Click Save Changes.
Your XML sitemaps are now active. You can view them by clicking the question mark icon next to the XML sitemaps switch. Then, click on the link that appears.
Customizing Sitemaps
The Yoast SEO plugin allows you to customize your sitemaps to fit your needs. Here’s how you can do it:
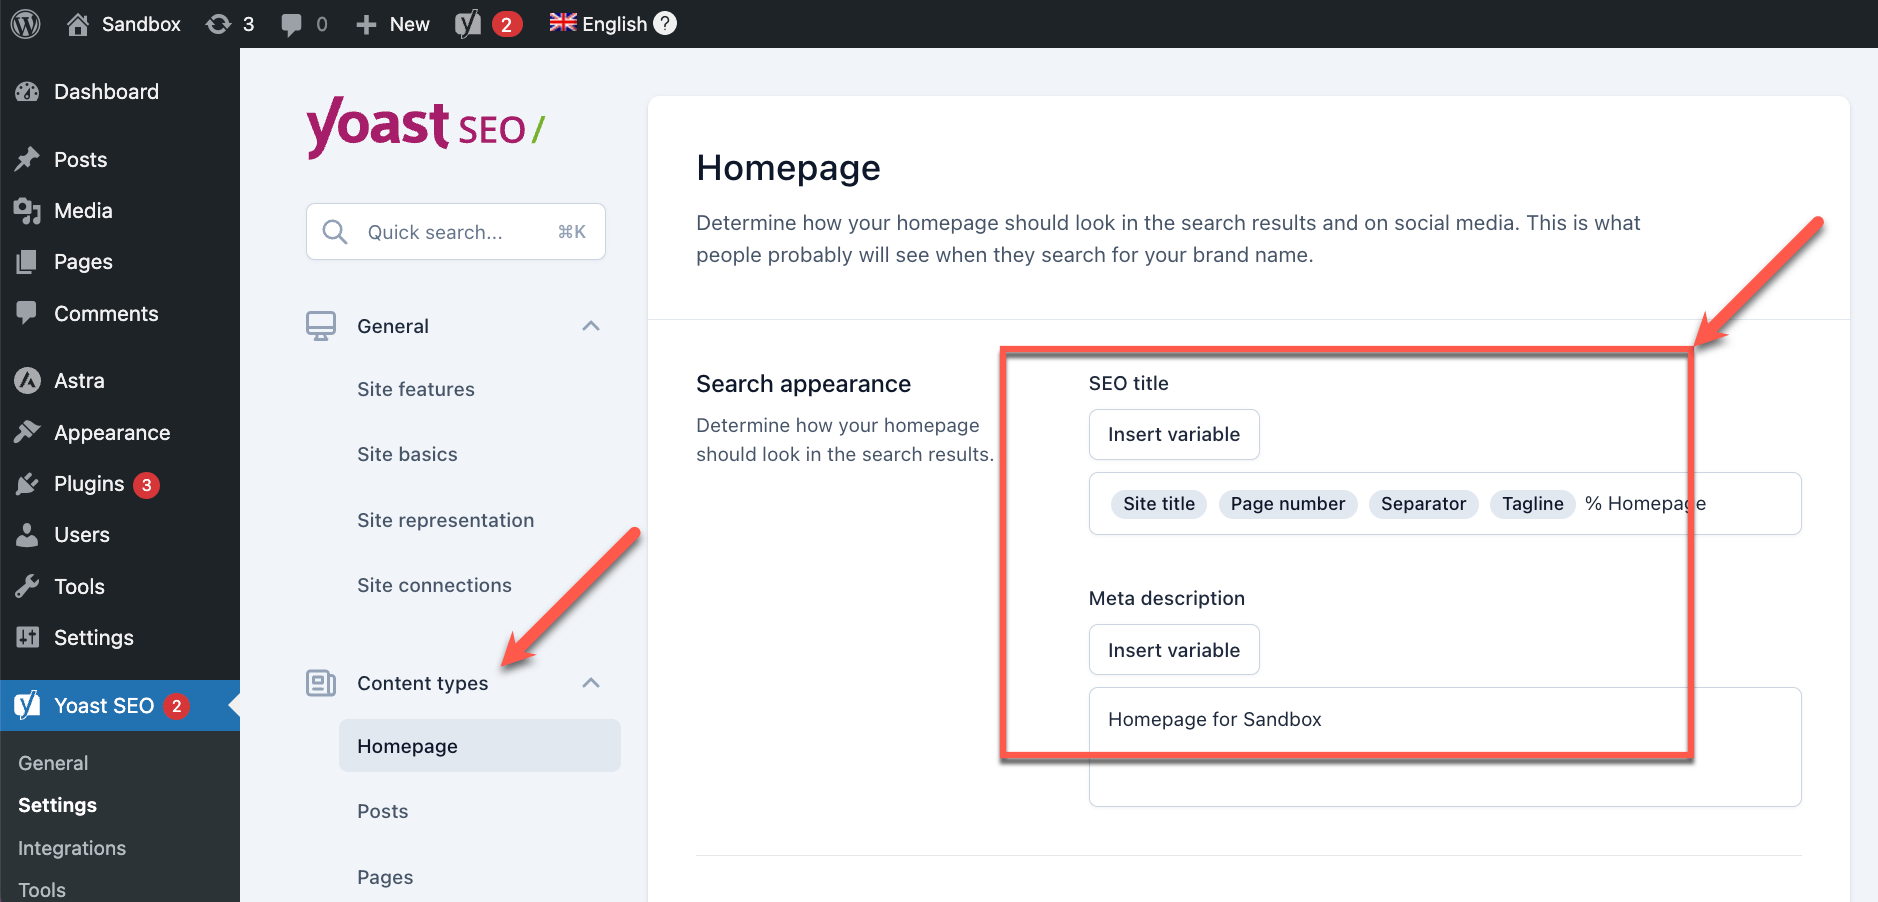
- Go to the SEO menu in your WordPress dashboard.
- Click on Search Appearance.
- Navigate to the Content Types tab.
Here, you can choose which post types to include in your sitemap. For example, you might want to exclude certain pages or posts.
- Toggle the switch to Include in sitemap for each post type.
- Adjust the settings for Posts, Pages, and Media.
- Click Save Changes.
You can also customize the taxonomy settings:
- Navigate to the Taxonomies tab.
- Toggle the switch to include or exclude categories, tags, and formats.
- Click Save Changes.
Customizing your sitemaps helps search engines find your most important content. This improves your site’s visibility and ranking.
Enhancing Social Media
Enhancing your social media presence is crucial for growing your blog. Yoast SEO Plugin for WordPress makes this process simple. This guide covers using Yoast SEO to improve your social media integration.
Social Media Integration
Yoast SEO offers tools for integrating your blog with social media. These tools help you control how your content appears on different platforms.
To start, navigate to the Social section in the Yoast SEO settings. Here, you can connect your blog to your social media profiles. This includes Facebook, Twitter, and more.
- Go to Yoast SEO settings.
- Select the Social tab.
- Enter your social media profile URLs.
Open Graph Data
Open Graph data helps social media platforms display your content correctly. Yoast SEO allows you to customize this data for each post and page.
To configure Open Graph data, follow these steps:
- Edit the post or page you want to optimize.
- Scroll down to the Yoast SEO meta box.
- Click on the Social tab.
- Fill in the Open Graph fields. These include the title, description, and image.
| Field | Description |
|---|---|
| Title | The headline that appears on social media. |
| Description | A brief summary of the content. |
| Image | The image shown with your post. |
Using Open Graph data ensures your content looks great on social media. This increases engagement and drives more traffic to your blog.
Using Advanced Tools
Using advanced tools in the Yoast SEO plugin can significantly enhance your SEO efforts. These tools offer powerful features to streamline your content optimization process. Let’s delve into some of these tools.
Bulk Editor
The Bulk Editor allows you to edit titles and descriptions for multiple posts at once. This feature saves time and ensures consistency across your site. To access it:
- Go to the Yoast SEO dashboard.
- Click on Tools in the left menu.
- Select Bulk Editor.
You will see a table listing your posts and pages. You can edit the SEO title and meta description directly in the table. After making changes, click Save.
File Editor
The File Editor is a powerful tool for editing important SEO files like robots.txt and .htaccess. To use this tool:
- Navigate to the Yoast SEO dashboard.
- Go to Tools.
- Select File Editor.
Here, you can make changes to your robots.txt file, which controls how search engines crawl your site. Be cautious when editing the .htaccess file, as incorrect changes can break your site.
Using the File Editor efficiently can enhance your site’s visibility and performance in search engines.
Implementing Schema Markup
Schema markup helps search engines understand your content better. It enhances your visibility in search results. Yoast SEO plugin makes adding schema markup easy. This section will guide you through the steps.
Schema Types
Yoast SEO supports various schema types. Each type serves a different purpose. Here are some common schema types:
- Article: For blog posts and news articles.
- Product: For individual product pages.
- Recipe: For food recipes.
- Event: For events like concerts or webinars.
- Local Business: For local businesses.
Adding Schema
Follow these steps to add schema using Yoast SEO:
- Go to your WordPress dashboard.
- Click on SEO in the left-hand menu.
- Select Search Appearance.
- Navigate to the Content Types tab.
- Choose the content type you want to add schema to.
- Scroll down to the Schema Settings section.
- Select the appropriate schema type from the dropdown menu.
- Save your changes.
Here’s a quick example of schema for an article:
{
  "@context": "https://schema.org",
  "@type": "Article",
  "headline": "How to Use Yoast SEO Plugin for WordPress",
  "author": "Jane Doe",
  "datePublished": "2023-10-01",
  "image": "https://example.com/image.jpg"
}
This JSON-LD code helps search engines understand your article. It improves your chances of ranking higher.
Monitoring Site Performance
Monitoring site performance is crucial for maintaining a healthy website. Using the Yoast SEO plugin for WordPress helps you keep track of your site’s SEO health and overall performance. Below, we will discuss how to use Yoast SEO to monitor your site’s performance effectively.
Seo Analysis
Yoast SEO provides a comprehensive SEO analysis feature. This helps you understand how well your pages are optimized. Follow these steps:
- Navigate to the post or page you want to analyze.
- Scroll down to the Yoast SEO meta box.
- Check the SEO Analysis section.
This section includes:
- Focus keyphrase: The main keyword you are targeting.
- Readability analysis: Checks the readability of your content.
- Content insights: Provides insights into your content’s structure.
Each point is marked with a color code:
| Color | Meaning |
|---|---|
| Green | Good |
| Orange | Needs Improvement |
| Red | Problems Detected |
Performance Tracking
Yoast SEO also helps you with performance tracking. This involves keeping an eye on various metrics to ensure your site is performing well. Key metrics include:
- Page Load Time: The time it takes for a page to load.
- Mobile Usability: How well your site performs on mobile devices.
- Indexability: Ensures search engines can index your content.
Follow these steps to track performance:
- Go to the Yoast SEO dashboard.
- Navigate to the General tab.
- Check the Site Performance section.
Regularly monitoring these metrics helps you keep your site in top shape. Use the insights gained to make necessary adjustments and improvements.

Troubleshooting Common Issues
Encountering issues while using the Yoast SEO plugin is common. This section helps solve these problems. Here, you’ll find effective solutions to the most frequent Yoast SEO issues.
Common Problems
- SEO Analysis not working
- XML Sitemap errors
- Meta descriptions not updating
- Missing Focus Keyphrase
Effective Solutions
| Issue | Solution |
|---|---|
| SEO Analysis not working | Ensure Yoast is enabled. Go to SEO > General > Features. Enable SEO Analysis. |
| XML Sitemap errors | Check permalinks settings. Go to Settings > Permalinks. Save changes without modifying. |
| Meta descriptions not updating | Clear your website cache. If using a caching plugin, clear its cache too. |
| Missing Focus Keyphrase | Enter a Focus Keyphrase in the Yoast meta box. Save your post/page. |
Using the Yoast SEO plugin can enhance your site’s search visibility. Follow these solutions to keep your plugin running smoothly.
Frequently Asked Questions
How Do I Implement Seo On My WordPress Site?
Install an SEO plugin like Yoast. Optimize your titles, meta descriptions, and URLs. Use keywords naturally. Create quality content. Ensure mobile-friendliness and fast loading speed.
Is Yoast Seo Free For WordPress?
Yes, Yoast SEO offers a free version for WordPress. It includes essential features for optimizing your website.
Does Yoast Improve Seo?
Yes, Yoast improves SEO. It optimizes your content, enhances readability, and ensures proper keyword usage. It also helps with meta tags and internal linking.
Can I Use Yoast On WordPress Com?
Yes, you can use Yoast on WordPress. com. It is available for Business and eCommerce plans.
What Is Yoast Seo Plugin?
Yoast SEO Plugin is a popular WordPress tool for optimizing your website’s search engine visibility.
How To Install Yoast Seo Plugin?
Navigate to your WordPress dashboard, click on Plugins, then Add New, and search for Yoast SEO. Click Install.
Conclusion
Mastering the Yoast SEO plugin can significantly boost your WordPress site’s visibility. Follow the steps outlined to optimize content effectively. Regularly update and monitor your SEO performance for the best results. With Yoast, improving your website’s search engine ranking becomes straightforward and manageable.
Start optimizing today and see the difference!

